FAQ
🔧 Server Installation
What do I need to prepare before installation?
Network Preparation: If you have a network provider and a camera provider, keep their contact details handy — we may need you to reach out to them to open specific access depending on your installation.. This is essential for the server to communicate with our services.
DVR Information: Gather the following about your CCTV system:
- brand and model of your DVR
- Login/password for the DVR
- IP address of the DVR
- Contact details of your CCTV vendor
Proxy or Firewall: If you use a firewall or proxy in your network, inform Veesion before installation so we can adapt the configuration.
Contact: installation@veesion.com
What comes in the box?
Contents:
- 1 Veesion Server
- 1 Power Supply
- 2 Ethernet Cables
- 1 Ethernet-USB Adapter
Check all items upon receipt. If anything is missing, contact the installation team immediately.
How do I install the server?
- Plug in the power supply: Connect the power cable to the server, then plug it into an electrical outlet. The server must remain powered at all times.
- Connect the Ethernet cable: Plug the Ethernet cable from the server to your router or network switch. This establishes the connection with your local network and our services.
- Wait for indicator lights: Let the server start up. You should see two lights come on: the Power light and the Internet light. This indicates the server is working correctly.
Our team will complete the configuration remotely. You will receive instructions to allow our technicians to access the server securely.
How do I find my DVR’s IP address?
- Access the DVR’s main screen: Use the remote control or physical interface of your DVR.
- Go to Settings → Network Settings: Navigate to the network section of the configuration menu.
- Look for the IPv4 address: You’ll find it in the network settings. It typically looks like four numbers separated by dots (e.g., 192.168.1.100).
Note this IP address — you’ll need it for our installation team. Contact: installation@veesion.com
🎯 Detected Gestures
What gestures does Veesion detect?
Veesion’s AI is trained to detect 11 specific gesture types, organized into 3 main categories. The system only detects gestures from these categories. Behaviors outside these categories will not be detected.
Body Gestures:
- 🔴 Concealment — The most important gesture, hiding a product in clothing. ⚠️ Always active, cannot be disabled. This is the foundation of Veesion detection.
- 🔵 Gesture Close to the Body — An optional gesture you can enable or disable. Detects suspicious movements near a person’s own body.
Bag Gestures:
- 🔴 Personal Bag — Always active. Detects suspicious interactions with a personal bag.
- 🔴 Backpack — Suspicious interaction with a backpack. Always active, cannot be disabled.
- 🔵 Suspicious Bag — Optional. Detects other types of suspicious bag behavior.
- 🔵 Baby Stroller — Optional. Detects suspicious interactions involving a stroller.
- 🔵 Shopping Bag — Optional. Detects suspicious gestures with a shopping bag.
Other Gestures:
- 🔵 Shelf Sweeping — Optional. Detects when products are bulk collected (4+ times in a row) and placed rapidly into a bag. Particularly useful for detecting organized theft.
- 🔵 Consumption — Optional. Detects when a customer consumes a product in the store.
- 🔵 Deblistering — Optional. Detects when a product is removed from its packaging or box.
- 🔵 Slightly Suspicious — Optional. Detects any gesture that isn’t clearly visible enough to be properly categorized, such as an unidentified object placed in a bag or hands on a shelf with invisible gestures.
Legend: 🔴 = always active (cannot be disabled) — 🔵 = optional (can be enabled/disabled per camera)
Adjust settings at Stores → Gestures. Choose between preset mode (Essential, Moderate, Maximum) or Expert mode for more granular configuration.
🎬 Interactive tutorial on gesture settings
Important: Behaviors outside these categories will not be detected. If you notice suspicious gestures you’d like Veesion to detect, report them via Accounts → Declare an Undetected Gesture.
🚫 What Veesion does NOT detect
Veesion’s AI is trained to recognize very specific concealment gestures. It’s important to understand the system’s limitations for realistic expectations:
- Grabbing an item and walking out without concealing it — If a customer picks up an item and keeps it in hand or in plain view without hiding it, the AI won’t trigger an alert. The system focuses on concealment gestures, not people leaving with items.
- Thefts committed entirely from behind — For the AI to properly analyze a gesture, the person’s position and movement must be visible to the camera. If someone commits theft while entirely facing away from the camera, the system cannot analyze the gestures involved.
- “Suspicious looks” (looking left and right) — The AI analyzes physical body gestures, not eye movements, head rotations, or facial expressions. Even if a customer appears nervous, this is not something Veesion can detect.
Understanding these limitations helps set realistic expectations and use Veesion as a complementary tool to human surveillance, not a replacement. Report missed alerts via Accounts → Declare an Undetected Gesture.
📦 New Features
What is the new dashboard and how do I use it?
The new Statistics Page gives you a quick and complete overview of your store’s health and activity. It’s a powerful tool for tracking your prevention statistics and system status.
What you’ll find:
- Real-time statistics: View alerts today, this week, and this month. Quickly see deterrence trends and patterns.
- Server health status: Live check that your Veesion server is working correctly and all cameras are connected.
- Recent activity: View latest qualified alerts and team actions.
Access it via Accounts → Statistics Page. We recommend checking it regularly, at least once a day.
What is the red box on my alert videos? (Risk Box)
The Risk Box is a red frame that appears around the person performing a suspicious gesture. It’s a visual feature designed to help you react faster and make better decisions.
How it works: The red box appears right at the moment of the detected suspicious gesture. Particularly useful in crowded aisles to quickly identify the person to monitor.
Important — The Risk Box does NOT:
- Provide identification or facial recognition
- Automatically detect confirmed theft
- Replace human qualification — you always remain the decision-maker
Key points:
- The box may not appear on every alert — the feature is being progressively deployed.
- The box shows only around the suspicious gesture moment and may disappear afterward — this is by design.
- It’s designed primarily for the alert video view but may also appear in extended video views.
Use the Risk Box as a visual targeting tool, never as sole legal basis for detention or action.
⭐ Best Practices
How can I get the most out of Veesion? (Best Practices)
Veesion’s AI monitors all your cameras simultaneously, 24/7. To maximize system effectiveness:
- Qualify every alert — Mark each alert as Suspicious or Not Suspicious. This helps our AI learn from your feedback.
- Add your entire team to the app — At least 3 active users per store for constant availability and quick reaction.
- Check cameras regularly — make sure your camera setup hasn’t changed and still covers the areas you would like us to monitor.
- Report every missed alert — Your feedback helps retrain the algorithm.
- Keep your opening hours updated — Correct hours ensure the system operates at the most critical times.
Interactive Tutorials:
Camera Positioning — Best Practices for Optimal Detection
Your camera positioning has a direct and significant impact on Veesion’s detection accuracy. A well-positioned camera maximizes gesture recognition, while a poorly placed camera can considerably reduce system effectiveness.
Optimal distances:
- Distance from camera to subject: Between 1.5 and 12 meters. In this zone, the AI can analyze gestures with the best precision.
- Optimal camera height: Between 1.8 and 3.8 meters. This height provides a clear view of the zone and body gestures.
- Camera orientation: Each camera should be centered on a single aisle or zone, not multiple. A field of view that’s too wide reduces analysis quality.
Common mistakes to avoid:
- Field of view too wide: If a camera covers too much area, the resolution per person becomes too low. The AI cannot properly analyze fine gestures.
- Cameras facing shelf sides: Side angles create blind spots and prevent the AI from having a complete view of gestures.
- Image quality too low: Low resolution, excessive compression, or poor lighting hurt detection. Make sure your cameras capture a clear image.
Golden Rule: If the human eye can easily spot a suspicious gesture in the camera feed, Veesion’s AI will also have a good chance of detecting it. If the gesture is invisible or blurry to a human, it will also be difficult for the AI.
Contact us via Accounts → Contact Us for camera positioning advice.
📱 App Questions
How to view the full alert video
Short answer. Tap Watch Full Video on any alert. You’ll get a longer clip in the original (non-accelerated) video quality — not the fast preview you see first.
How to access the full video
- Open any alert in the Veesion app.
- Tap the video at the top of the alert.
- Tap the Watch Full Video button.
- The full-length video opens. You can pause, scrub, and rewatch.
Don’t see the button? Update the Veesion app from the App Store or Google Play to the latest version.
Why the preview is short and accelerated
The first video you see when an alert arrives is a lightweight, accelerated preview (a short looped clip). This is intentional — the goal is speed.
A small, compressed preview reaches your phone in a few seconds instead of tens of seconds. That’s critical when you need to react before the suspect leaves the store. A full-quality video would take much longer to upload and load — by the time you could watch it, the moment to act might be gone.
So the trade-off is:
- Default preview — small, fast to load, accelerated → optimized for reaction time.
- Full video (Watch Full Video) — full length, original quality, normal speed → optimized for investigation and clarity.
You always have access to both. The preview helps you react fast; the full video helps you understand what happened.
What you get with the full video
| Default preview | Full video (Watch Full Video) |
|---|---|
| Short, looped clip | Longer, full-length clip |
| Compressed for speed | Original (non-accelerated) quality |
| Accelerated playback | Normal playback speed |
| Loads in a few seconds | Takes a bit longer to load |
Still not enough quality after Watch Full Video?
If the full video is still blurry or pixelated, the issue is likely with your DVR / video recorder’s source stream quality. Veesion processes the video feed from your recorder — if the source resolution or bitrate is too low, no amount of processing can recover the lost detail.
Improving your DVR’s video quality
Veesion processes the Sub Stream (not the Main Stream) from your DVR. To improve video quality, increase the Sub Stream settings.
Recommended Sub Stream settings:
- Resolution: D1 (704×480 NTSC / 704×576 PAL) or higher
- Bitrate: above 1000 kbps
- Frame rate: 10 fps
Hikvision: Configuration → Video/Audio → Video. Select the Sub Stream tab. Set Resolution to D1 or higher, Bitrate to above 1000 kbps, Frame Rate to 10 fps.
Dahua: Main Menu → Setting → System → Encode. Select the Sub Stream tab. Set Resolution to D1 or higher, Bit Rate to above 1000 kbps, Frame Rate to 10 fps. Click Apply.
Other brands: Look for Encode Settings or Recording Settings in your DVR’s configuration menu. Find the Sub Stream section and set Resolution to D1+, Bitrate above 1000 kbps, and FPS to 10.
Note: D1 (704×480 NTSC / 704×576 PAL) gives a good balance of quality and bandwidth. Higher resolutions like CIF or 720p also work but use more bandwidth.
Need help?
Contact us via Account → Contact Us in the app, or email support@veesion.com. Our team can advise on the optimal Sub Stream settings for your specific DVR model.
The videos of the alert are not loading, what do I do?
Note: This article is about alert videos that fail to load or play correctly. If you’re not receiving any alerts at all, see the section “📉 No/low alerts” below.
If your alert videos aren’t loading, follow these steps in order:
- Check your internet connection: Make sure your device (phone or tablet) is connected to a stable Wi-Fi or mobile data network. A weak or unstable connection can prevent videos from loading. Try loading a simple web page to verify connectivity.
- Compare with colleagues: Ask a team member at the same store if they’re experiencing the same issue. If the video loads fine for them, the problem is likely with your phone or connection, not the central system. If everyone has the same issue, it’s a server problem.
- Test on another device: Check if the video plays on a different device (colleague’s phone, tablet, computer) or a different web browser. This helps isolate whether the problem is specific to your device.
- Update the app: Make sure you have the latest version of the Veesion app installed. Go to your app store, search for Veesion and check for available updates. If the issue persists after updating, try completely uninstalling and reinstalling the app.
- Only some cameras affected? If videos from one camera won’t load but other cameras work fine, the issue may be related to your DVR or server connection for that specific camera. Contact us directly with the affected camera name.
Still not resolved? Contact us directly in the app via Accounts → Contact Us including details: which videos won’t load, since when, and whether other users have the same problem.
How do I add my team to the app?
Adding your team to the Veesion app is simple and quick. This allows you to set up continuous monitoring with multiple users. Here’s how:
- Open the app and go to Stores: Select the store you want to add users to.
- Tap “Invite Users”: You’ll find this button in the store settings.
- Choose the invitation method: The new member can sign up with: email address, phone number, or an unlimited invite code you can share with the team.
- Approve the request: As the store owner, you must approve the access request before the new user can see alerts. This ensures security and access control.
Available roles:
- Store Owner: Full access, can manage users and settings.
- Store Manager: Full access to alerts and settings, no user management.
- Security Agent: Access to alerts and qualification, no settings access.
- Store Employee: Limited access to relevant alerts.
Tip: We recommend at least 3 active users per store for constant coverage and quick response to alerts.
How do I manage my team’s access across multiple stores?
If your teams work across multiple stores, you need to manage access per user. It’s simple:
- Go to Stores → Users: You’ll see the list of all users with access to your store.
- Tap the pencil icon: Select the user you want to modify.
- Update information: You can: Update contact details (email, phone), Change assigned role, Add or remove store locations they have access to.
Changes take effect immediately. The user will automatically see the new stores in their app.
How can I see my previously qualified alerts?
Your qualified alert history is available at any time. You can review it to analyze patterns, verify your team’s actions, or review decisions.
- Go to the Alerts page: This is the app’s main screen.
- Tap the Archive icon: This button gives you access to all qualified alerts.
- Browse the history: You’ll find all qualified alerts from the last 30 days, with the date, time, camera, and status (Suspicious or Not Suspicious).
Important note: History is kept for 30 days. After that period, videos are permanently deleted from the system. If you need to keep videos from an important alert, download it or take a screenshot during the retention period.
How can I see who qualified an alert?
It’s important to track who made decisions on alerts. You can easily see this:
- Go to the Alerts page: Open the alerts section.
- Tap the Archive icon: To view qualified alerts.
- Select an alert: Open the alert video.
- Check the details: The name of the user who qualified the alert appears in the alert details.
This information is useful for auditing or training. Store Owners and Store Managers have full visibility on who qualified each alert.
What should I do if my store’s hours change?
Veesion works best when your opening hours are up to date in the system. You can easily modify them:
- Go to Stores: Select the store.
- Tap Opening Hours: You’ll see the current hours.
- Modify the hours: Enter the new hours for each day of the week. You can have different hours on weekends or specific days.
Important note about 24h operations: If your store operates 24/7, our servers need to go offline for one hour per day for essential maintenance restart. During setup, choose the one-hour window that works best for your store — preferably a low-traffic period.
I forgot my password, what can I do?
If you’ve forgotten your password, you can easily reset it:
- On the login screen: Tap “Forgot Password”.
- Enter your identifier: Provide your email or phone number associated with the account.
- Receive the code: You’ll receive a reset code via email or SMS, depending on your preference.
- Create a new password: Enter the code and create a new password.
Didn’t receive anything? Check your spam or promotions folder first. If you still have nothing, contact Accounts → Contact Us for manual assistance.
Where can I find my invoices?
Access your billing history directly from the app — no need to contact support for past invoices.
Steps
- Open the app and go to Account.
- In the Invoices section, tap View invoices to see your billing history.
- Select any invoice to view or download it.
Need an invoice that isn’t listed? Contact us via Account → Contact Us with your store name and the period you need.
The app is slow, crashing, or not loading
Most performance issues are resolved in under 2 minutes with these basic checks.
1. Check the basics
- Make sure your phone has a stable internet connection (Wi-Fi or 4G/5G).
- Close other apps running in the background.
- Force-close Veesion and reopen it.
2. Update the app
Go to the App Store (iOS) or Google Play (Android) and check if a Veesion update is available. Always use the latest version.
3. Restart your phone
A simple restart clears temporary memory and resolves most performance issues.
4. Reinstall the app
Uninstall Veesion, then reinstall it from the App Store or Google Play. Your account and data are preserved.
Still not working? Contact us via Account → Contact Us with your phone model, OS version, and a description of when the issue happens.
I can’t log in to the app
Login issues usually fall into one of three categories. Run through these checks in order.
1. Check your credentials
- Confirm you’re using the correct, current email and password.
- Passwords are case-sensitive — make sure Caps Lock is off.
- If you’re using a manager’s invitation, double-check the invitation code.
2. Forgot your password?
Tap “Forgot password?” on the login screen and follow the instructions sent to your email or SMS. Check your spam folder if the email doesn’t arrive within a few minutes. (See also: “I forgot my password, what can I do?”)
3. App or device issue?
- Force-close the app and reopen it.
- Make sure you’re on the latest version (App Store / Google Play).
- Restart your phone.
Still locked out? Reach out to support@veesion.com with your store name and email address. We’ll verify your account and reset access manually if needed.
📉 No/low alerts — what to do?
Why am I not getting many alerts?
If you’re not receiving any alerts at all, the most common cause is a technical incident (Server Down) — meaning your Veesion server has lost its connection to our network.
👉 See the full guide: I got a “Technical Incident / Server Down” notification — what do I do? — complete step-by-step diagnosis with LED indicators, in-app recovery, and escalation steps.
Quick checks:
- Open the app — is there a red or orange banner at the top? If yes, follow the guide above.
- Check your internet connection — many cases are actually local network issues. Try pulling down to refresh the alerts list.
- Check your cameras — go to Stores → Cameras and see if they’re all online.
If none of the above applies and you’re still getting zero alerts, contact support for a diagnosis.
Why am I getting irrelevant alerts?
If you’re receiving too many alerts that don’t correspond to genuinely suspicious gestures, here’s how to improve the situation:
- Check your gesture settings at Stores → Gestures:
- Preset mode: If you’re currently on Maximum, try reducing to Moderate. If you’re on Moderate, try Essential. Reduced sensitivity eliminates false positives.
- Expert mode: We strongly recommend disabling “Customer with bag in aisle” and “Suspicious bag” — these gestures often generate more false positives.
- Identify problem cameras: If only certain cameras generate irrelevant alerts, it may be a positioning or lighting issue. Contact us with those camera names.
- Qualify your alerts: By marking alerts as “Not Suspicious”, you help our system learn what’s not relevant in your specific context.
🎬 See how to qualify alerts — This interactive tutorial shows you how to correctly classify your alerts.
Overwhelmed by volume? You have two options:
- Adjust gesture settings at the store level (as described above)
- Adjust your personal notification preferences — You can configure your account to receive only “Highly Suspicious” alerts, without changing the store’s global settings.
Tip for teams: If you’re getting too many alerts because some are for other colleagues, you can modify your own notification settings to receive only “Highly Suspicious” alerts. This doesn’t change store settings for other users.
Why am I not receiving any alerts? (DVR/Server Issues)
If you’re receiving no alerts at all, this is a more serious issue than simple sensitivity. Follow these diagnostic steps:
Step 0 — Check if there’s a known incident: Open the app and check if there’s a banner indicating a technical incident. If yes, our team is already working on it. You’ll be notified when service is restored.
Step 0.5 — Check your own internet connection: Many “server down” cases are actually local internet failures at the store level. Test your internet connection on your phone. Also try pulling down to refresh the alerts list in the app.
Step 1 — Check the server connection: Go physically check the server:
- Unplug the power
- Wait 30 seconds
- Plug the power back in
- Wait for the server to fully restart (lights should come on)
- Check two lights: Power (should be on) and Internet (should be on or blinking, not off)
Step 2 — Check your cameras: Go to Stores → Cameras and verify:
- Are all your cameras listed?
- Do they all show “Connected” or “Online” status?
- Are any cameras showing “Offline” or “Not Connected” status?
Step 3 — Final diagnosis: If cameras are visible but you’re still receiving zero alerts, it’s a deeper communication issue between the server and our cloud system. Contact us immediately for an in-depth diagnosis.
Still not resolved? Contact us via Accounts → Contact Us including: the exact time of the issue, the server light status, whether cameras are online in the app.
🔍 Report a Missed Alert — What to Do?
How do I report an missed alert?
If you detect a theft that Veesion missed, report it immediately. Your feedback is valuable and directly helps improve the system.
How to report:
- Go to Accounts → Declare an Undetected Gesture
- Fill in the details: Include: exact date and time, camera name, gesture description (e.g., “Person hid a product in their shirt”), video clip if possible.
What happens next: Our team uses your feedback to: retrain the algorithm on missed gesture types, make sensitivity adjustments specific to your store or camera, contact you only if there’s a concrete action on your end (e.g., repositioning a camera).
Every report helps make Veesion more effective for all users.
I ran a test theft and the system didn’t detect it — what should I do?
Manual tests are an excellent way to verify system functioning. If you perform a simulated theft test and Veesion doesn’t detect it, here’s how to proceed correctly and report the result.
How to run an effective test:
- Face the camera or stand to the side: Make sure your body and gestures are clearly visible to the camera, not completely from behind.
- Pick up a product and hide it in your clothing: This should be a natural concealment gesture — hiding a product in a pocket, under clothing, etc.
- Walk out of the area with the product: Walk normally out of the camera’s field of view.
- Don’t wear an employee uniform: Dress like a customer for a realistic test.
- Note the exact time and camera name: You’ll need this information to report the result.
Before testing: Inform your Veesion contact (Customer Success Manager) before performing the test, so they know what to expect.
After the test, report the result via Accounts → Declare an Undetected Gesture with all the details above.
🔔 Notification Management
Can I get push notifications for alerts?
Yes, absolutely! Veesion supports push notifications to keep you informed in real time of alerts, no matter where you are.
How to check:
- Check the app settings: Open Veesion and go to notification settings to see if they’re enabled.
- Check phone settings: Go to Settings → Notifications → Veesion on your phone and make sure notifications for Veesion are enabled.
Alert sound: The app includes a distinctive alert sound with a 45% volume boost over standard notifications. This helps you notice alerts even if your phone is on silent or sitting on a desk.
If you’re not receiving notifications after checking these settings, see the “Notification Management” section or contact us.
How do I manage my alert notifications?
You have full control over the type and timing of your notifications. Go to Notification Settings to access these options:
1. Filter by suspicion level: You can choose which types of alerts notify you:
- Highly Suspicious — Alerts with the highest confidence of suspicious behavior
- Moderately Suspicious — Alerts with moderate confidence
- Slightly Suspicious — Alerts with low confidence
- Theft Detected — When a colleague confirms an alert is a confirmed theft
- Tagging — When a colleague specifically tags or mentions you
- Technical Incident — System problem warnings
All categories can be toggled on or off independently — even Highly Suspicious. You have complete flexibility to define your own balance between information and quiet.
Recommendation: If you’re overwhelmed by alerts, we strongly recommend enabling only Highly Suspicious as a first step. This will drastically reduce volume while keeping the most relevant alerts.
2. Schedule your notification hours: You can set specific times during which you want to receive notifications. For example, be notified only during your shift hours.
🎬 Interactive tutorial on notification scheduling
3. Temporarily pause all notifications: If you need a quick break, you can suspend all notifications for a set duration: 2 hours, 4 hours, 8 hours, or a custom period.
Important: This only changes your personal notification preferences. It does NOT change store-level gesture settings, so alerts will continue to be generated and your colleagues will still see them.
I don’t do security — can I just be notified when a theft is confirmed?
Yes, this is an ideal configuration for owners or managers who delegate surveillance to a security team but want to stay informed of confirmed incidents.
How to configure:
- Go to Notification Settings
- Go to Filter by suspicion level
- Disable everything except “Theft Detected” — This means you’ll only be notified when a colleague confirms a real theft.
With this configuration, you’ll stay informed of important incidents without being overwhelmed by daily alerts. You can check the Statistics Page regularly for overall statistics.
My alerts seem late — how to identify the real cause in 60 seconds
Veesion alerts are typically delivered in under 30 seconds (median around 18 seconds) from the moment a suspicious gesture happens in your store to the moment your phone receives the notification. So when an alert feels “minutes late”, the delay almost always comes from something else than the actual delivery — and you can identify which one in under a minute.
Run through the four checks below. In most cases the alert was delivered on time, and the perceived delay comes from one of these common causes that you can identify and fix yourself.
Check 1 — Is the time on your video recordings actually correct?
Open the alert clip in your Veesion app. You’ll see a timestamp burned into the image, usually in the top-left or top-right corner. That timestamp comes from your DVR — the device that hosts all your cameras — not from Veesion.
Now open one of your cameras live in the Veesion app, and compare the burned-in time on the live image to the actual current time on your phone.
If they differ by 1, 5, or even 10 minutes, your DVR’s clock has drifted. This is very common — DVRs lose a few seconds per day if they aren’t synced to the internet, and the drift accumulates silently for weeks.
Why this matters: when your DVR’s clock is off, the timestamp burned into every recording — from every camera on that DVR — is off too. So when you watch a clip taken at 14:03 (real time), the recording shows “13:55” because your DVR is 8 minutes behind. The alert was sent at the real moment of the event, but the clip looks like it happened 8 minutes earlier — making it feel as if the alert took 8 minutes to arrive.
Action: Resyncing the DVR clock fixes it for all your cameras at once (they all share the same clock). Ask your security installer to enable internet time sync on the DVR — it’s a 2-minute fix in the DVR’s settings page. In the meantime, trust the time shown on the live view of the Veesion app, not the timestamp burned into the recording.
Check 2 — Are your colleagues viewing the alerts faster than you?
Ask one or two colleagues in the same store: “When that alert came in, how long did it take you to see it on your phone?”
- If your colleagues view alerts within seconds and you only see them later → the issue is on your phone, not on Veesion’s side. Move on to Check 3 — your phone is silencing or delaying notifications.
- If everyone in your store sees alerts late → the delay is happening before the alert reaches anyone’s phone. Re-check Check 1 (DVR clock drift) if you haven’t already, and check whether your store’s internet connection or wifi is stable.
- If you’re the only person on the Veesion app in your store → you have no comparison point. Skip to Check 4 and consider adding teammates.
This is the fastest single test: if other people in the same store, on the same network, view alerts within seconds, then nothing about Veesion’s delivery is broken — the difference is on your specific phone. If you contact support, we can verify peer view-times on our side in seconds.
Check 3 — Your phone is silencing Veesion notifications
Phones routinely mute apps without telling you. After a phone update, after a Focus or Do-Not-Disturb session, after enabling battery-saver, or after a system-level “this app uses too much battery” prompt — your phone quietly turns Veesion’s push notifications off, or delays them by minutes or hours.
If your colleagues are getting alerts within seconds and you’re not (Check 2), this is almost certainly what’s happening.
Quick self-check — the time-of-day pattern. If you only get notifications outside store opening hours but never during your shift, your phone’s Focus or Do Not Disturb mode is the culprit. It’s silencing Veesion exactly when you need it most.
For the full step-by-step setup (allow notifications, sound, banners, Focus exceptions, battery-saver exclusions on both iPhone and Android), follow our notification setup guide: “Can I get push notifications for alerts?”.
After you re-enable notifications, ask a colleague to qualify any alert in your store as a test — you should receive the push within 30 seconds.
Check 4 — Is anyone else in your store viewing the same alerts?
If only one person in your store has the Veesion app installed, you have a single point of failure. The moment that person puts their phone down, no one in the store views the alert.
The fastest way to make alerts feel “real-time” again is simply to have two or more people receiving them. The first one to react covers everyone.
Action: Invite the store owner, the manager, and any security agents to the Veesion app, and make sure each of them completes Check 3.
(See the FAQ article “How do I add my team to the app?” for step-by-step invite instructions.)
Louder alert sound in the app (February 2026)
The latest Veesion update includes an improved alert sound with a +45% volume boost over standard notifications. This makes it easier to notice incoming alerts, even in a noisy environment like a store.
If the sound is too loud: You can adjust your phone’s overall volume in audio settings. Go to Settings → Sounds & Haptics → Volume on your phone and reduce the notification volume to your preference.
This improvement helps reduce missed alerts without requiring constant screen vigilance.
I’m not receiving push notifications
If you’ve configured your notification preferences but still get nothing on your phone, the issue is usually outside the app. Run through these checks.
1. Check your phone settings
- Go to Settings → Notifications → Veesion on your phone.
- Make sure notifications are enabled.
- On iOS: also confirm “Allow Notifications” is on and notification style is not set to “Off”.
2. Check your in-app settings
- Open the app and go to Notification Settings.
- Confirm the gesture types and suspicion levels you want to receive are activated.
- Check your notification schedule — you may have set quiet hours covering the current time.
3. Force a refresh
- Force-close the app and reopen it.
- Log out and log back in.
4. Last resort: reinstall
Uninstall Veesion and reinstall it from the App Store / Google Play. Your account is preserved.
Still nothing? Contact us via Account → Contact Us with your phone model, OS version, and the time of the last alert you should have received.
🔒 Privacy & GDPR Compliance
Does Veesion process biometric data?
No. Veesion does not process biometric data and does not perform facial recognition. This is a central point of our ethical design.
How it works: Our system analyzes gestures and body movements independently of individuals. The AI cannot know if the same person enters your store twice, nor identify a specific person. It only sees behaviors.
Legal compliance: Compliant with Article 4(14) of GDPR, which defines biometric data as data resulting from specific technical processing enabling identification or authentication of a natural person. Veesion performs none of these functions.
Key Veesion Principles:
- No facial recognition — Zero facial or trait identification
- Gesture analysis only — Focus on movements, not identity
- Ethics Charter — A formal charter guides all developments
- Limited data retention — Videos stored for maximum 30 days, then automatically deleted
For complete GDPR documentation, contact Accounts → Contact Us.
⚠️ Technical Incidents
I got a “Technical Incident / Server Down” notification — what do I do?
Follow this guide to diagnose the issue yourself and get your alert detection back online.
1. What happened?
Your Veesion server has lost its connection to our network. This means alert detection is paused — you won’t receive new theft alerts until the connection is restored.
Your camera recordings are not affected. Your video recorder (DVR) continues recording independently. Only the AI analysis is paused.
✅ Good news: most incidents resolve on their own. About 70% of Server Down events are caused by brief network interruptions. The server reconnects automatically (median: ~10 hours), and you receive a notification when detection resumes. No action needed in most cases.
If the issue doesn’t resolve on its own, the first thing to do is go look at your server and check the indicator lights.
2. Diagnose the issue: check the lights on your server
Your Veesion server is a small black box, usually installed near your video recorder or network equipment. It has two indicator lights — one on the front, one on the back.
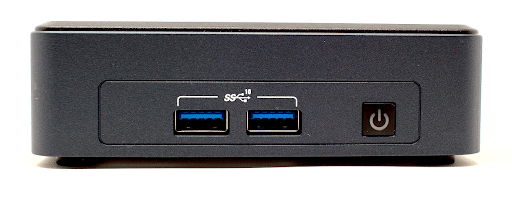
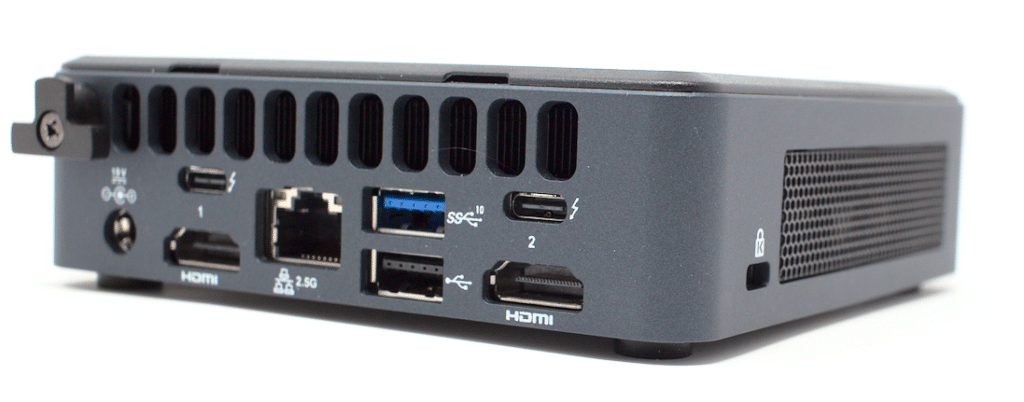
Photos: Intel NUC 11 Pro Tiger Canyon — the model used in Veesion servers. Credit: StorageReview.com
⏻ Power light (front — blue ring around the power button):
- ⚫ Off — no power. Check the cable and outlet.
- 🔵 Solid blue — running normally. Now check the back.
- 💡 Blinking blue — startup error. Unplug 30s, replug. Still blinking? Book a call.
🔌 Network light (rear — small LED on the Ethernet port):
- ⚫ Off — no cable detected. Replug both ends or swap cable.
- 🟢 Green — connected to network. Try the in-app recovery (section 4).
- 🟠 Orange / amber — cable detected but no internet. Restart your router.
Step 1 — Look at the front: what does the power button look like?
- ⚫ No light — the server is completely dark: Check the power cable at the back. Is it firmly plugged in? Try a different outlet. Check your fuse box if you recently had a power outage. If the server stays dark, it may have a hardware failure — book a support call.
- 🔵 Solid blue — the server is on: Good — now go check the back → Step 2.
- 💡 Blinking — startup error: Unplug the power cable, wait 30 seconds, replug. If blinking continues, book a support call.
Step 2 — Look at the rear: what does the light on the Ethernet port look like?
- ⚫ No light: Network cable not detected. Check both ends are firmly plugged in (“click”). Try a different port on your router. Try a different cable.
- 🟠 Orange / amber: Cable detected but no internet. Wait 2–3 minutes. Restart your router (unplug, wait 30s, replug). If it started after a network change, a VPN port may need reopening — book a support call.
- 🟢 Green — connected: Server is powered and connected. The issue is a blocked VPN port or software problem. Try the guided recovery flow in the app. If it started after a network change, book a support call.
⏳ After any action (replugging a cable, restarting the router…), wait 3–5 minutes for the server to fully reconnect.
3. Understanding the banner in your app
When a technical incident is active, a banner appears at the top of your alert feed:
- 🔴 Red — “Alert detection interrupted”: Full outage. All cameras affected. Tap to start recovery.
- 🟠 Orange — “Alert detection partially interrupted”: Some cameras still working. Tap for details.
- ✅ Green — “Alert detection restored”: Everything is back to normal.
Tap on the banner to enter the guided recovery flow.
4. The guided recovery flow in the app
When you tap the banner, the app walks you through a step-by-step recovery. You need physical access to the server. The process takes about 10 minutes.
- Introduction screen: The app explains the incident. You can call a colleague from this screen if you don’t have physical access.
- Locate the server: The app shows what the server looks like and where it’s typically installed.
- Unplug and replug (~2 min): A video guides you: unplug the power cable, wait 30 seconds, plug it back in.
- Automatic verification (2–5 min): The system checks if the server has reconnected.
✅ Success: The banner disappears and alerts resume.
⚠️ If verification fails: You can retry, check your network, or book a support call. Many successful resolutions happen on the 2nd or 3rd try.
5. Common causes and what to do
- 🔌 Internet outage: Check if other devices have internet. Restart your router (unplug, wait 30s, replug). The server reconnects automatically once internet is restored.
- 🔄 Router or internet box replacement: Make sure the Ethernet cable is plugged into the new router. Some routers close the VPN port — if the network light stays orange, book a support call.
- ⚡ Power outage: The server usually restarts automatically. If not, unplug and replug the power cable. Try a different outlet.
- 🔀 Ethernet cable disconnected or damaged: Check both ends. Make sure you hear a “click”. Try a spare cable.
- 🌐 Network or firewall change: New firewall rules can block the VPN port. Ask your IT provider or book a support call.
- 🖥️ Software issue (both lights on, no alerts): Use the in-app recovery flow. If it doesn’t work, book a support call — we can restart the software remotely.
6. Rebooting didn’t fix it — what now?
- Wait 5 minutes. The software can take up to 5 minutes to become operational.
- Check the lights again. The diagnosis may have changed.
- Check your full network chain. Restart your router/switch. Test other devices on the store’s Wi-Fi. Check all cables.
- Try the in-app recovery again. Tap “Retry” from the incident screen.
🚨 Incident lasting more than 48 hours? Don’t wait longer. Book a support call immediately.
7. Book a support call
If the self-diagnosis steps haven’t resolved the issue, book a video call with a Veesion support technician.
Path: Incident banner → Start recovery → Recovery failed → Book a call
When you book, it helps to note:
- What the power and network lights look like right now
- Whether you already tried rebooting (and how many times)
- Whether anything changed recently (new router, renovation, power outage…)
- Whether other devices in the store have internet
Can’t access the incident screen? Go to Accounts → Contact Us in the app.
Changing your internet provider
Switching internet providers is one of the most common causes of Veesion outages. The steps depend on your setup type.
☁️ Cloud setup (no Veesion box on-site)
Your cameras send video to Veesion over the internet. When your provider switches the connection, expect a short interruption — and your IP address may change. In most cases, your system reconnects automatically within a few minutes.
Before the switch
Contact Veesion Support at least 48 hours in advance. Let us know the date and time so we can monitor your system during the changeover.
One key question: Are you keeping your existing router, or is your new provider giving you a new one?
- Same router → settings preserved. The system should reconnect on its own.
- New router → connection settings will need reconfiguration. Let Support know in advance so we can prepare.
After the switch
- Wait 5–10 minutes after the new internet is live. Most cameras will reconnect on their own.
- If cameras are still offline after 15 minutes, restart your DVR: turn it off, wait 30 seconds, turn it back on.
- Still offline? Contact Veesion Support — we’ll check connectivity from our end.
🖥️ Local Server (on-site Veesion box)
Your Veesion server sits inside your store and connects to our platform automatically. When your internet switches over, it usually reconnects on its own.
Before the switch
Contact Veesion Support at least 48 hours in advance with the planned date and time.
After the switch
- Wait 5–10 minutes. The server should reconnect automatically.
- If still offline, restart the Veesion server: turn it off, wait 30 seconds, turn it back on.
- Still offline? Contact Veesion Support for a remote connectivity check.
⚠️ Getting a new router? Always let us know in advance. A new router may block connections our server needs. We can verify this remotely once the switch is done.
Store renovations or construction work
Renovations, construction, or major rearrangement in your store can affect Veesion performance. A 5-minute heads-up to Support saves hours of downtime later.
Before work begins
- Contact Veesion Support. Share the start date, expected duration, affected areas, and whether any cameras will be moved.
- Protect your equipment. Cover the Veesion server and cables to shield them from dust, paint, and water.
After the work is done
- Visually inspect every camera. Confirm each one points at the right area and isn’t blocked. If any camera moved, let us know so we can update the system to monitor the correct angles.
- Restart the system if alerts haven’t resumed within an hour.
ℹ️ Major layout change? New aisles, moved shelves, new checkout points — a camera repositioning review may be needed. Contact your CSM to plan it.
I see “Alert Detection Degraded” — how do I fix it?
“Alert Detection Degraded” means our system is having trouble receiving video from one or more cameras. Detection may be paused on those cameras. The most common cause is a temporary DVR issue — a quick restart usually fixes it.
How to restart your DVR
- Locate the DVR. Look for the flat black recording box with cables running to it from the cameras, plus a power cable.
- Power it down. If the DVR has a physical power button (usually front or back), press and hold until it shuts down. If there’s no button, it’s safe to unplug the power cable from the back.
- Wait 30 seconds. This lets the device fully shut down and clear its memory.
- Plug the power back in (or press the power button again). The DVR takes 1–2 minutes to fully restart. Fans spinning and lights blinking are normal.
- Check the Veesion app after 5 minutes. The “Degraded” status should clear.
Still degraded after a restart?
- Check that all camera cables are firmly connected to the DVR.
- Verify the DVR has internet access (its network indicator should be green/blue).
- Contact us via Account → Contact Us with the incident notification and the time you restarted.
💡 Difference with “Server Down”? Server Down = your entire Veesion server lost connection (no alerts at all). Alert Detection Degraded = some cameras are affected; others may still be working. For full outages, see the “I got a ‘Technical Incident / Server Down’ notification” article.
Didn’t find the answer to your question?
Need help? Contact us via Accounts → Contact Us in the Veesion App
Select the category that best matches your request:
Billing
- Cash collection
- Invoice error
- Send the invoice
- Invoice question
- Pricing modification
- Payment modification
Contract
- Churn Request
- Ask to send the contract
- Contract modification
Upsell
- Upsell
- Expansion
Referral
- Referral
Detection Rules
- Activate gesture
- Deactivate gesture
Camera Changes
- Camera changes
Setup
- Setup
Store Info
- Store info
Undetected Gesture
- Detectable missed
- Undetectable
No Alert
- DVR Credentials
- Internet Network
- Server issue
- Stream issue
- Phone roaming
- Phone settings
Delays
- Average Delays Under 50
- Average Delays Over 50
Irrelevant Alerts
- Gesture(s) not relevant
- Error alert
Guidance
- Need a training
- App question
App Bug
- App bugs
Follow-up
- Follow-up
Unsatisfaction
- Client Not Satisfied